Wednesday, April 21, 2021

Working with truly unique and therefore precious fabrics


My very best friend gave me an amazing gift last December. 

6 Unique Indonesian Batik Fabrics

Her brother was stationed in Indonesia with the Swiss Consulate and the Consulate commissioned local artisans to create a Swiss themed fabric line. I was the lucky     recipient of several of those fabrics.


The red fabrics


The blue and green fabrics

Paper version of the fabric, regular color copy of the fabric


Maquette of the block, made by glueing the printed papers on a drawn-out block
 

No way I would waste any of it to check what it might look like. Instead I did the following:

I used my copy machine. I printed 4 pages, 2 each of the colors and then glued the pieces on the printed block.This allows me also to keep the fabric pieces fairly big, as cutting them too small would not do them justice. Now I will place them on a wall and reflect, weather this is what I want to do. 

The size of the inside cross needs to be adjusted to the accurate size which is square flag and arms that longer than the width and the exact width apart from the edge. 

All that is left to do is choose the best size of the block and piecing sequence of the center, while paying attention to the exact dimension as well as possible. And maybe make more paper maquettes to check other color-ways of the block.


Friday, March 20, 2020

Quilt-As-You-Go, in rows, Quilt in progress

 This is a quilt I am working on. I had made 12 Log Cabin blocks, that I set with green alternating blocks with an applique circle. I pieced 4 log cabin blocks and 4 green blocks together into a small top, as shown. I layered it with batting and backing and use water solvable thread to stitch around the perimeter of the quilt part.
The final quilt center will have 3 parts and borders, but as I said it is in progress...
 Here you see the three parts. The middle part is quilted and trimmed.
But stop - not yet.
There is a trick to the trimming. The backing and batting are trimmed to the perimeter stitching line and the top extends 1/4" out. The regular seam allowance will be added to the next part. On the back, backing and batting will butt together. the seam on the back will be covered with a strip.


 Center panel quilted and trimmed, view from the top
Here you see the same panel from the back and the 1/4" seam allowance.


 Here the special ruler I used to trim the panel. This ruler has a metal lip that pushes the top back when you trim the batting and backing.
 Here the ruler flipped over, so you see the metal lip

Because each panel is done that way, this construction technique will allow that the back can have a geometric design too.

More once I have progressed further...

Tuesday, March 17, 2020

Für meine Schüler zu St. Patricks Day

 Das brauchst du dazu:
1 Stück Filz, Stoff oder farbiges Papier, grün ist am besten (ca. 4" x 4")
Pappe von einer Frühstückflockenbox
dünner schwarzer Filzstift
Faden
Nähnadel mit nicht zu dünnem Öhr (eye of the needle)
 Im geschickten Email hast du die Vorlage. Drucke sie aus, klebe sie auf die Pappe und schneide dann aus. Evtl. kannst du auch einfach das Papier auschneiden, allerdings musst du dann sorgfältig arbeiten.
Mach eine Pappschablone
 Schneide sie aus und benutze die Schablone, um 4 solche Teile auf den Filz oder das Papier zu zeichen.
So wie hier.
 Schneide die einzelnen Teile aus.
 Schneide einen langen Faden ab und mach am Ende einen dicken Knoten.
 Stich in die vier Punkte ein. Rauf und runter, wie im Bild...
 1 Blatt aufgefädelt.
 alle vier nach einander auf dem gleichen Faden aufgefädelt.
 Verknote nun den Anfang mit dem Ende. Zieh stark and und...
voilà - ein Kleeblatt entsteht.

Tuesday, November 5, 2019

Color Recipe - Paint Chips and Color Wheel to the Rescue

A couple days ago Bonnie Hunter announced the colors for the 2019/20 Frolic Mystery. Today I went to the Kelly Moore Paint store to look for paint chips in those colors. With the color tool I came up with yellow-green (3-24), aqua (8-20, blue (11-13), cerulean blue (10-8) and blue-red (18-12/13) and many light neutral colors for contrast.

Before going I had analyzed the colors and how they were spread along the color wheel. Once there I also looked at the combination below. This one was one I liked too.

 The colors would be aqua green (instead of yellow-green), yellow-orange (instead of red-blue), blue-violet (instead of aqua), red-violet (instead of blue) and purple (instead of cerulean blue).


When taking into account that the intensity of the colors varies, I come up with this palette.
The blue in the picture on the right is a bit too intense and the one below too dull... something in between.
But I kind of like the idea of rich, burnt orange with violet/purple and aqua green. I have to seen the right aqua green paint chip.

Once I look through my stash, I will know more.
Or I will go back and look at my other options.
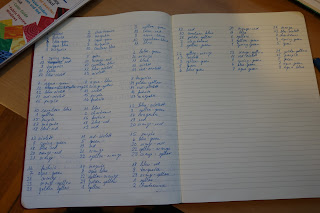
I have written out 24 different variations.

Monday, November 4, 2019

"Flower" Curtains for Disentis

In January I saw that the bathroom curtains in the mountain house were in tatters. Mending would not have worked as they had had stitched eyelets to tread through ribbons. One ribbon was missing, eyelets were ripped through.

Because the apartment from time to time is rented out, I want it to look loved and nice. During our vacation in Japan, I cam across a pretty fabric and bought several meters of it.


 This is the fabric I bought. All of the sudden I found it too plain...
... and decided to give it a personalized note by adding blue French knots. That way it will match better with the blue bathroom tiles.

Baby Quilt: Scrappy Mountain Majesties

This is my version of a baby quilt using a free pattern from Bonnie Hunter.
I started like in the pattern with 8 1/2" squares. 32 colored fabrics and 32 plain white ones.The blocks finish 6" x 7 1/2" rectangle. I used her instructions for making the block. They can be found here: https://quiltville.blogspot.com/2005/06/scrappy-mountain-majesties.html

I chose a very different path for quilting. I wanted to quilt this baby quilt on my home machine. Through my guild I had signed up for a free motion quilting class. The last thing I need in my sewing room is another stack of sample blocks.
 This is why laid out the blocks and instead of piecing all of them into a quilt top pieced 8 of them into a row and quilted the quilt in 4 sections. Afterwards I pieced the sections together to complete the quilt.


On the back you can see the 4 rows. I used 2 different fabrics alternating them for the sections.
The trick was, that unlike "regular" quilt-as-you-go pieces with sashing pieces that connect the sections and cover the seams on both, front and back of the quilt, a different technique is used here.

Below a step by step guide:

Don't piece the whole quilt top together, instead piece the sections into rows. Layer each section individually with batting and backing, I used Quilters Select Free Fuse instead of pins, BoNash, would be a similar product. Backing fabrics and batting should be bigger that the sections for the top.

Tread machine top and bottom with water soluable thread. Stitch 1/4" inside along the edge. Each sections that will be attached to another section, can now be trimmed back. I used a special ruler for this task. (Trimmer by George 2.0, available at www.hoopsisters.com). That ruler has an unique feature. A metal "lip" that allows the top fabric to be pushed/folded back and allows you to only trim the backing and batting. Only do this on edges that will connect to another section, not along the edge of the quilt, not on areas that will be covered with binding.

Change thread to what you like to use and quilt sections. It also works great as a way to test new quilting patterns or instead of quilt sandwiches for a class.

Once all sections are quilted using a 1/4" seam allowance sew the seams. Sew only the top fabric. Backing and batting are trimed back. Prepare fabric strips. Left-over fabric works great. Strips need to be 1 1/2" to 2" wide, fold in half, open, fold edges to the center. Use Elmers Washable School Glue and apply glue over the joint. Cover with strips, hiding the joined sections. Everything should be completely flat. I like to hand-stitch the strips down.

Join all sections like this. Trim back top, bottom and sides and prepare quilt for binding. Bind quilt.. The last 3 pictures show me using the technique on another quilt.

 1/4" stitched with water-soluable thread
 Top fabric needs to be fold back, because I will need it to connect the sections. Only backing and batting get trimmed back to the stitching line.
Using the special ruler to trim.

The advantage of this technique: You can quilt a big quilt on your home machine without wrestling with all the bulk and still not have any visible joining strips on the front.

Sunday, December 16, 2018

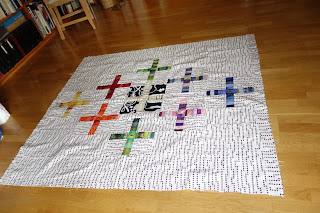
Plus Sign Baby Quilt


This quilt is a left-over scrap quilt.
I had bought the back ground fabric at Ikea, did not have quite enough, therefore I used another Ikea print for the center black fabric background cross. I had sewn a summer skirt for myself in July, well, I've sewn three. One with the black kitchen themed background and a skirt with a white Ikea fabric that I hand embellished. I will post pictures, but right now it is too cold...
I got the idea from this blog: https://weallsew.com/scrap-plus-quilt-along-week-1/